


How to Make Traditional Mursik
The Ancestral Craft: A Detailed Procedure for Making Mursik
Mursik, more than just a beverage, is a cultural cornerstone for the Kalenjin community of Kenya. This traditional fermented milk drink holds deep historical significance, representing hospitality, celebration, and a connection to ancestral ways. Its distinctive smoky tang and rich, thick consistency are unlike any other dairy product, a testament to a unique preparation method honed over generations. Making mursik is not merely a recipe; its an ancestral craft that blends science with tradition, culminating in a truly remarkable and healthful drink.
This procedure will guide you through each step, offering insights into the why behind the how, allowing you to recreate this authentic Kenyan delicacy.
Ingredients:
- Fresh Whole Milk: Traditionally, unpasteurized cows milk is preferred for its natural microbial content, which aids fermentation. However, pasteurized whole milk can also be used, though it might require a starter (like a spoonful of existing mursik or a live yogurt culture) if natural fermentation doesn readily occur. The fat content of whole milk is crucial for the desired creamy texture.
- Itet (Charred Stick): This is the heart of mursiks smoky flavour. The itet is a stick from specific trees known for imparting the desired aroma and color. Common choices include Senna didymobotrya (Sisal, locally known as Ketoch), Lippia kituiensis (locally Cheptalel), or most authentically, Olea africana (African Olive, locally Emitiot). The itet is not just any burnt stick; its carefully selected and prepared to ensure the right charcoal and volatile compounds are imparted.
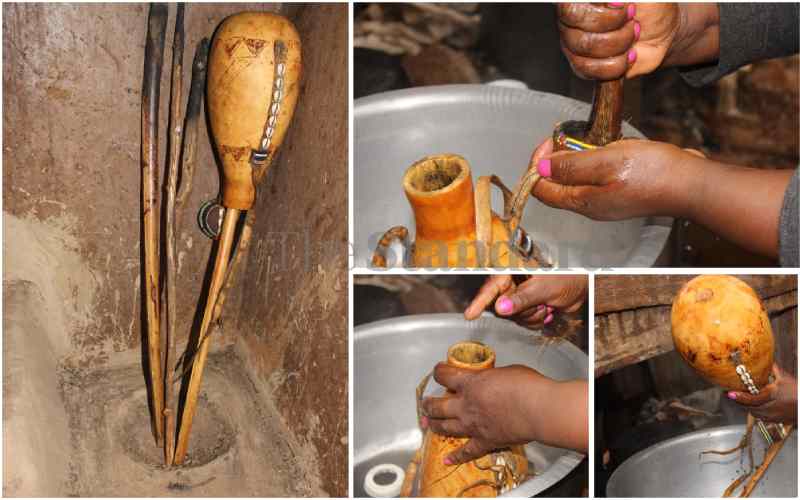
- Sotet (Calabash Gourd): This is absolutely indispensable for authentic mursik. The sotet is a specially prepared and cured calabash gourd. Its porous nature and the ingrained char from repeated use contribute significantly to the flavor profile and serve as the ideal vessel for fermentation.
Equipment:
- Sotet (Calabash Gourd): As mentioned, a well-cured one.
- Clean Cooking Pot: For heating the milk. Stainless steel is recommended for hygiene and even heating.
- Lid: For the cooking pot.
- Strainer or Fine Cheesecloth (Optional): For removing any minute charcoal particles, although traditionally, some small particles are acceptable.
- Source of Heat: A stove (gas or electric) or a traditional open fire.
The Procedure: A Journey from Milk to Mursik
Phase 1: Preparing the Sotet (The Sacred Vessel)
This is arguably the most critical step, as it imbues the mursik with its characteristic smoky flavour and helps preserve it. This process is known as kutwek in Kalenjin.
- Initial Cleaning (for new gourds): If you are using a brand new sotet, it must be thoroughly cleaned to remove any residual fibres or dust. Rinse it vigorously with very hot water, perhaps even boiling water, multiple times. Some traditionalists might even fill it with water and let it sit for a day or two, changing the water frequently, to leach out any initial bitterness. Ensure it is completely dry before proceeding.
- Charring the Itet: Take your chosen itet stick and heat one end directly in a flame until it glows red hot and forms a significant layer of black charcoal. The goal is to create a solid, stable ember that produces copious soot.
- Smoking the Sotet (Kutwek):
- Carefully insert the glowing hot, charred end of the itet into the sotet.
- Immediately cover the opening of the sotet as much as possible with your hand or a cloth to trap the smoke.
- Gently but continuously rotate the sotet in all directions. The aim is to ensure the rising smoke and the fine soot particles generated from the itet evenly coat the entire inner surface of the gourd. You should hear a gentle sizzling or crackling sound, and a distinct smoky aroma will emanate from the gourd.
- Periodically, remove the itet, reheat it to rekindle the glow and create more charcoal, and then reinsert it into the sotet, repeating the rotation.
- Continue this process until the entire interior of the sotet is covered with a dark, almost tar-like layer of soot. This coating is not just for flavor; it contains compounds that act as natural preservatives and contribute to the unique texture of the mursik. This step might take 15-30 minutes, depending on the size of the gourd and the efficiency of the charring.
- Final Cleaning of the Sotet: Once adequately smoked, gently shake the sotet upside down to dislodge any loose, flaky charcoal bits. Some people will pour a small amount of warm water (around half a cup) into the gourd, swirl it vigorously, and then discard the water. This helps to clean out excess loose charcoal without disturbing the vital embedded layer. After this, ensure the sotet is thoroughly dried before introducing the milk. A well-cured sotet will have a strong, pleasant smoky aroma.
Phase 2: Preparing the Milk
The quality and temperature of the milk are vital for successful fermentation.
- Heating the Milk: Pour the fresh whole milk into your clean cooking pot.
- Boiling (Highly Recommended): Bring the milk to a rolling boil over medium heat. Stir continuously to prevent scorching at the bottom of the pot. Boiling serves a dual purpose:
- Sterilization: It kills any potentially harmful bacteria present in the milk, especially crucial if using unpasteurized farm milk.
- Altering Milk Proteins: Boiling slightly alters the milk proteins, which contributes to the final thick, custardy texture of the mursik.
- Cooling the Milk: Once boiled, immediately remove the pot from the heat. Allow the milk to cool down significantly. This is a critical step. The milk must be warm, but not hot. The ideal temperature is lukewarm, roughly body temperature (around 37∘C / 98.6∘F). If the milk is too hot, it will kill the beneficial lactic acid bacteria responsible for fermentation. If its too cold, the fermentation process will be sluggish or may not initiate properly. You should be able to comfortably dip your clean finger into the milk without feeling any discomfort from heat.
Phase 3: Initiating and Managing Fermentation
This is where the magic of transformation happens, as the milk cultures into mursik.
- Introducing Milk to the Sotet: Carefully pour the cooled, warm milk into the prepared, smoky sotet. Fill the gourd up to its neck, leaving about 1-2 inches of headspace from the very top. This allows for slight expansion as the fermentation gases build up.
- Sealing the Sotet: Traditionally, the sotet is sealed with a corn cob, a banana leaf plug, or a tightly fitted wooden stopper. The key is to create an airtight seal. This promotes anaerobic (oxygen-free) fermentation, which is essential for the growth of the desired lactic acid bacteria and inhibits the growth of spoilage microorganisms.
- Storing for Fermentation: Place the sealed sotet in a warm, dark, undisturbed place. Ideal ambient temperatures for fermentation range from 20∘C to 28∘C (68∘F to 82∘F). Avoid direct sunlight or cold drafts, which can hinder the process.
- Fermentation Time: The fermentation process typically takes 2 to 3 days, but this can vary depending on the ambient temperature, the initial microbial content of the milk, and the curing of the sotet.
- Observation: During this period, the milk will gradually thicken. You might observe a slight separation of whey (a clear yellowish liquid) from the curds, which is normal.
- Testing for Readiness: The mursik is ready when it has achieved a uniform, thick, yogurt-like consistency. It should have a distinctly tangy aroma, characteristic of fermented milk, combined with the underlying smoky notes. It should not smell putrid or overly sour in an unpleasant way. If you gently tilt the gourd, it should move as a thickened mass rather than sloshing like liquid milk.
Phase 4: Serving and Storage
Once fermented to perfection, your mursik is ready to be enjoyed!
- Preparation for Serving: Gently shake the sotet before pouring to ensure the consistency is uniform and to reincorpor any separated whey.
- Serving: Mursik is traditionally served chilled or at room temperature. It can be poured into cups directly from the sotet.
- Traditional Pairing: It is most commonly enjoyed alongside ugali (a stiff cornmeal porridge), especially during mealtimes, where it acts as a refreshing and nutritious accompaniment. It can also be drunk on its own as a healthy, probiotic-rich beverage.
- Storage: Once fermented, mursik can be stored in the refrigerator for up to a week to slow down further fermentation and maintain its desired consistency and flavor. Over time, it will continue to ferment, becoming tangier and potentially thicker.
Important Considerations and Tips for Success:
- Hygiene is Paramount: Every piece of equipment, especially the sotet, must be impeccably clean to prevent the growth of undesirable bacteria that could spoil the mursik or make it unsafe.
- Temperature Control: Precise temperature management during the cooling and fermentation phases is the single most important factor after the sotets preparation.
- The Itet Choice: The type of wood used for the itet significantly influences the final flavor. Experimentation (if you have access to different traditional woods) can yield subtle variations.
- Patience: Fermentation is a natural process that cannot be rushed. Allow the mursik the time it needs to develop properly.
- Troubleshooting:
- Too watery: Milk might have been too cold, or not enough beneficial bacteria.
- Too sour: Fermented for too long, or stored in too warm a place.
- Off-smell: Contamination from unclean equipment or improper smoking of the sotet. Discard if it smells putrid.
- Continuous Use of Sotet: Over time, a well-used sotet develops an optimal internal environment for mursik making, making subsequent batches even better. The embedded charcoal and a small amount of residual fermented milk (if not washed too rigorously) can act as a natural starter culture for new batches.

You Might Also Like
-
Bahati and Diana Marua are teasing a grand event on March 1st, 2025, sparking speculation of a glamorous wedding after a series of lavish gifts and social media hints.
-
African music beefs have become a powerful tool for fame, relevance, and industry dominance. While some rivalries, like Cassper Nyovest vs. AKA, were deeply personal, others, such as Bahati vs. Willy Paul, seem orchestrated for publicity. In an era where controversy boosts streams and media attentio
-
As Valentine’s Day approaches, some men may use the holiday as an excuse to end the relationship. Watch for signs like emotional distance, avoiding commitment, or complaints about the pressure of the holiday. If your boyfriend is acting strangely, it might be a sign he’s planning to break up bef
.jpeg)